Guides › Boxridge Raw

How to use Boxridge Raw
Boxridge Raw turns a folder or a whole card of RAW files into JPEGs that already look like a good camera JPEG. Add your photos, check the preview, press Convert.
1Install, try it free, and enter your key
- Click Download free 14-day trial on the Boxridge Raw page and run RawBox-Setup. It installs for your user only: no admin password and no Windows prompt. Windows 10 and 11 (64-bit).
- Every feature works for 14 days with no account and no credit card. After that RawBox still opens and previews your photos, and Convert asks for a license key.
- When you buy, your license key is shown right after payment, emailed to you and kept in your account. In Boxridge Raw choose More → Enter License Key, paste the whole block from -----BEGIN to END----- (or open the .key file) and click Activate. The PC needs the internet that first time; one license covers 3 of your PCs, and Remove License in the app (or My software on this site) frees a PC. After that it works offline and never expires.
2Add your RAW files
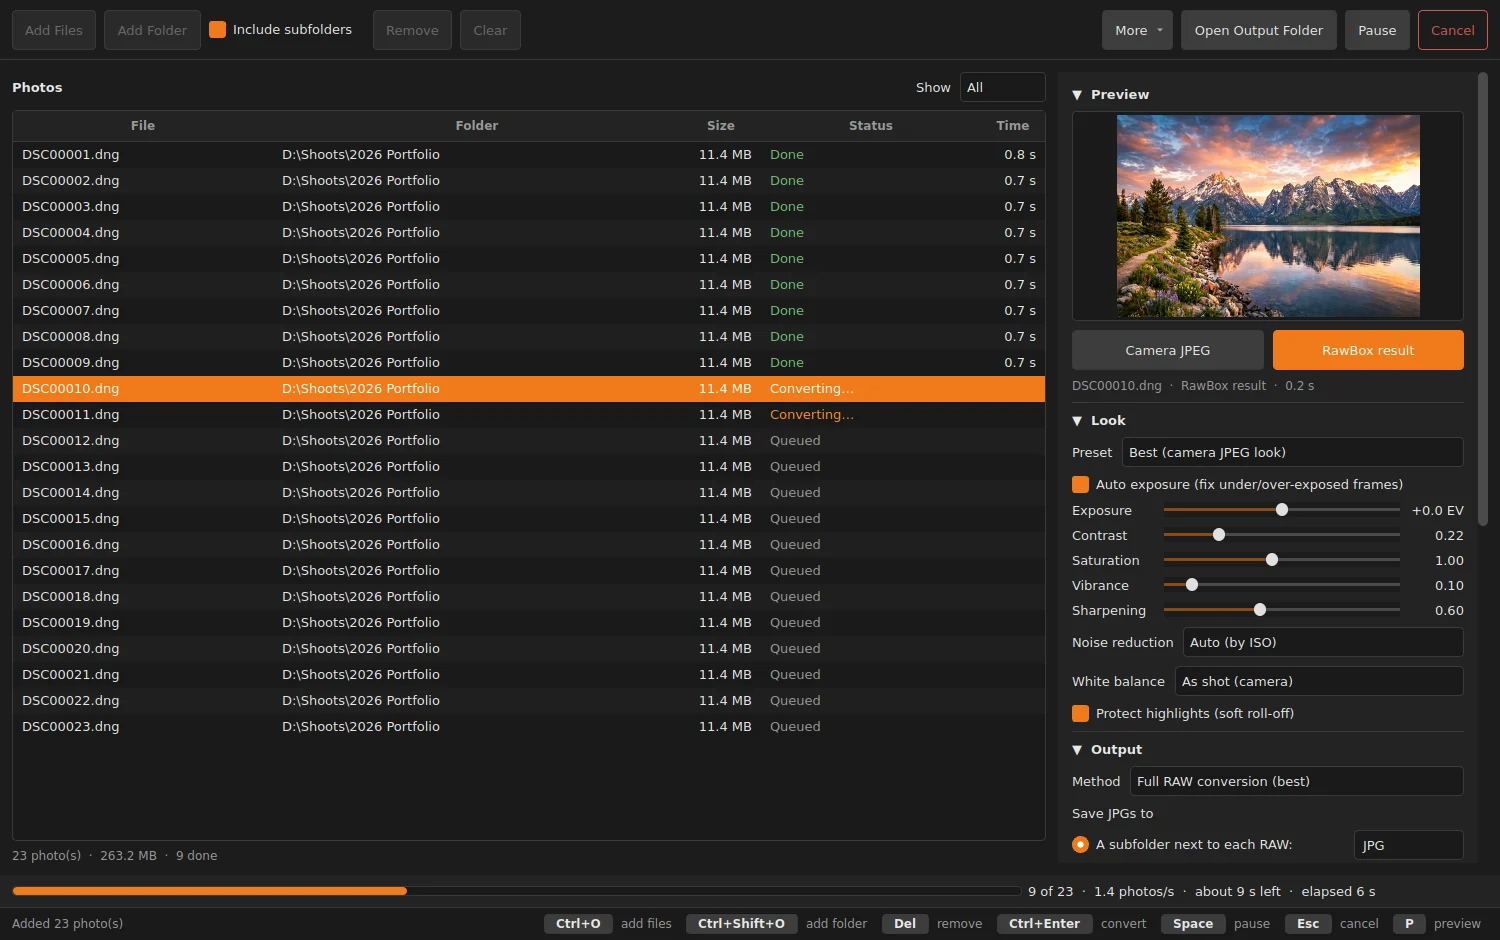
- Drag RAW files, folders or a memory card onto the window, or use Add Files (Ctrl+O) and Add Folder (Ctrl+Shift+O).
- Leave Include subfolders ticked to pick up every photographer’s sub-folder.
- Adding the same folder twice is fine: files already in the list are ignored.
3Check the look
- Click a photo, then switch the preview between Camera JPEG and Boxridge Raw result (or press P).
- Pick a Preset: Best (camera JPEG look) for finished JPGs, Vivid for more punch outdoors, or Flat for Lightbox if FinishBox will do the toning.
- Adjust Exposure, Contrast, Saturation, Vibrance and Sharpening if you like. Double-click a slider to reset it.
- Auto exposure fixes under- and over-exposed frames; Protect highlights keeps skies and white jerseys from blowing out.

4Choose where the JPGs go
- Save JPGs to: a subfolder next to each RAW (JPG by default), the same folder, or one folder (optionally keeping the sub-folder structure).
- If the JPG already exists: Skip (default, so re-running resumes a job), Replace, or Keep both.
- Size: full size, or a long edge from 6000 px down to 1080 px. Smaller is much faster.
- Quality: 50 to 100 (92 is the default).
- Method: Full RAW conversion (best), or Camera’s built-in JPEG for a near-instant extract.
5Convert
- Press Convert N Photos (Ctrl+Enter).
- The progress bar shows photos per second and time left. Your PC stays usable while it works.
- Pause with Space, cancel with Esc. Finished photos are kept; cancelled ones go back to Waiting.
- When it’s done, Open Output Folder takes you to the JPGs. Double-click a finished row to open it.
6If something fails
- Set Show to Failed to see each failed file and the reason.
- More → Retry failed files, or save the list.
- Right-click any row to open the JPG, show it in Explorer, convert it again or remove it.
Keyboard shortcuts
| Ctrl+O | Add files |
| Ctrl+Shift+O | Add folder |
| Del | Remove selected |
| Ctrl+Enter | Convert |
| Space | Pause / resume |
| Esc | Cancel |
| P | Switch preview |
Questions
Do my captions and bib numbers carry over?
Yes. All EXIF, IPTC and XMP metadata is copied to the JPG, and XMP sidecar ratings, labels and keywords are merged in.
How many photos can I load?
The list is built for 20,000+ files and stays fast.
Can I run it from the command line?
Yes: RawBox.exe --cli <files or folders> with options for output folder, long edge, quality, workers and preset.
Still stuck? Send us a message and the person who wrote the software will get back to you.